SBND Commissioning - Get Started Guide
Log in to an SBND virtual machine, for example:
ssh $USER@sbndgpvm01.fnal.gov
You will land in an area called nashome, from there you have two main
other areas available:
/exp/sbnd/app/users/$USER/: Here you should store your software (if this directory doesn’t exist, you can create it withmkdir /exp/sbnd/app/users/$USER)./exp/sbnd/data/users/$USER/: Here you should store your files (if this directory doesn’t exist, you can create it withmkdir /exp/sbnd/data/users/$USER). Remember that theapparea has limited disk space, so please do not store any data file there, but only the code you need.
1 - Setup the SBND environment
Go to the app area, where we can install and develop software:
cd /exp/sbnd/app/users/$USER/
Setup the SBND environment first:
source /cvmfs/sbnd.opensciencegrid.org/products/sbnd/setup_sbnd.sh
It is good practice to move to a custom working directory (you can give it a name of your choice):
    MY_WORKDIR=/sbnd/app/users/$USER/workdir
    mkdir $MY_WORKDIR
    cd $MY_WORKDIR
2 - Run existing larsoft software
setup sbndcode v09_24_00 -q e20:prof
This setup allows you to have the full sbnd software available, without the need to build it yourself. This is useful if you need to run existing software. If instead you need to modify existing code (or create new one), you will have to download sbndcode in your area, develop, and build your version of sbndcode. Instructions to do this are in the section below.
You can also list existing sbndcode versions by running
ups list -aK+ sbndcode
In general, you should select the latest version.
3 - Install and develop larsoft software
You can skip this section if you don’t need to develop sbndcode.
After steps 1 and 2, you can start setting up your development area:
    mkdir my_larsoft
    cd my_larsoft
    mrb newDev
    source localProducts*/setup
    cd srcs/
    mrb g -t v09_24_00 sbndcode
    cd $MRB_BUILDDIR
    mrbsetenv
    mrb i -j4
    cd ../
    mrbslp
Done! You have just built your own version of sbndcode. Now, you can
develop software in the srcs/sbndcode directory, and the install
software will be places in the localProducts* directory.
Do not do development in the localProducts* or build* directories,
as every change will be lost with a fresh build. Only develop in the
srcs directory.
If you log out and log in again, these are the steps you need to follow to get your environment set up (after doing the usual steps 1 and 2):
cd my_larsoft
source localProducts*/setup
mrbslp
The first time you build your code, you need to invoke mrb i -j4 (as
done above), but every subsequent time you can just do
make install -j4, which is slightly faster.
Build your own LArSoft plug-in
You can skip this section if you don’t need to develop sbndcode.
Now let’s assume you need to have your own LArSoft plugin (or module).
Go into srcs/sbndcode/sbndcode and start by creating your own
directory:
    cd my_larsoft
    cd srcs/sbndcode/sbndcode/
    mkdir MyProject
We want CMake to know about your folder, so it will be build. You can do this by adding
add_subdirectory(MyProject)
at the end of my_larsoft/srcs/sbndcode/sbndcode/CMakeLists.txt.
Good, now CMake will build that, but we need to add something inside it!
Let’s generate our first module:
    cd MyProject/
    cetskelgen analyzer MyAnalyzer
cetskelgen will create a template for your plug in (in this case an
analyzer one, but can also be a producer or a filter) with name
MyAnalyzer.
You can develop your own LArSoft code inside the MyAnalyzer_module.cc.
For now, we will just build the module as it is (empty).
Now let’s make our own, simplest, CMakeLists.txt. Open a file called
CMakeLists.txt inside the ` MyProject` directory, and add these
lines:
    art_make(
              MODULE_LIBRARIES larcorealg_Geometry
                               larcore_Geometry_Geometry_service
                               larsim_Simulation lardataobj_Simulation
                               larsim_MCCheater_BackTrackerService_service
                               larsim_MCCheater_ParticleInventoryService_service
                               lardata_Utilities
                               larevt_Filters
                               lardataobj_RawData
                               lardataobj_RecoBase
                               larreco_RecoAlg
                               lardata_RecoObjects
                               larpandora_LArPandoraInterface
                               nusimdata_SimulationBase
                               ${ART_FRAMEWORK_CORE}
                               ${ART_FRAMEWORK_PRINCIPAL}
                               ${ART_FRAMEWORK_SERVICES_REGISTRY}
                               ${ART_ROOT_IO_TFILE_SUPPORT} ${ROOT_CORE}
                               ${ART_ROOT_IO_TFILESERVICE_SERVICE}
                               art_Persistency_Common canvas
                               art_Persistency_Provenance canvas
                               art_Utilities canvas
                               ${MF_MESSAGELOGGER}

                               ${FHICLCPP}
                               ${ROOT_GEOM}
                               ${ROOT_XMLIO}
                               ${ROOT_GDML}
                               ${ROOT_BASIC_LIB_LIST}
                               sbndcode_RecoUtils
            )

    install_fhicl()
    install_source()
Now we need to compile again, go to build directory (which you can also reach via cd $MRB_BUILDDIR) and run
make install -j4
If you log out and log in again, you don’t need to run all the steps above, but to get your area setup you should run step 1 and 2 above, then:
    cd my_larsoft
    source localProducts*/setup
    mrbsetenv
    mrbslp
And you are good to go.
4 - Generate Single Particle Events
This section will show you how to generate particles in the SBND detector to simulate a sample of single-particle generated events. “Single-particle” means that every event will contain an initial generated particle, with the kinematics of your choice. The event will not contain a simulated neutrino event. Note that the initial particle is then propagated though GEANT4, which might then create additional other particles in the event (delta-rays, electromagnetic showers, etc.).
Once you have done steps 1 and 2, open a new file (call it, for example,
prodsingle_muon_sbnd.fcl) and add the following lines in it:
#include "prodsingle_sbnd_proj.fcl"

physics.producers.generator.PDG: [13]             # Generate muons (1 muon per event)
physics.producers.generator.P0: [3]               # With an initial momentum of 3 GeV
physics.producers.generator.X0: [155]             # At a starting X position = 155 cm
physics.producers.generator.Y0: [0]               # At a starting Y position = 0
physics.producers.generator.Z0:[-25]              # At a starting Z position = -25 cm
physics.producers.generator.Theta0XZ: [-11.]      # With an initial angle of -11 degrees in the X-Z plane, from the Z axis
physics.producers.generator.Theta0YZ: [0]         # With an initial angle of 0 degrees in the Y-Z plane, from the Z axis
physics.producers.generator.SigmaThetaXZ: [20]    # With an angular spread of 20 degrees in the Y-Z plan
physics.producers.generator.SigmaThetaYZ: [20]    # With an angular spread of 20 degrees in the Y-Z plan
physics.producers.generator.AngleDist: 1          # With angles Gaussian distributed
(More information on all the settable parameters can be found here)
prodsingle_muon_sbnd.fcl is your driver to run larsoft jobs.
You can run via:
lar -c prodsingle_muon_sbnd.fcl -n 10
where the option -n 10 means that we are generating 10 events.
If you now look in the directory (can do it via ls -ltrh), you can see
that several files have been produced. One of them is called
prodsingle_sbnd_SinglesGen-XXX.root. This is the file that contains
the generated events, with our muons in them. The events in this file
have not been propagated in the detector using GEANT4 just yet, and the
detector simulation has also not happened. We need to run this ourself.
Here is how to run GEANT4:
lar -c standard_g4_sbnd.fcl -s prodsingle_sbnd_SinglesGen-*.root -n 10
This job will produce an output file called
prodsingle_sbnd_SinglesGen-XXX_G4-XXX.root, which now contains the all
the particles propagated by GEANT4.
Finally, we can run the detector simulation:
lar -c standard_detsim_sbnd.fcl -s prodsingle_sbnd_SinglesGen-*_G4-*.root -n 10
The output file prodsingle_sbnd_SinglesGen-XXX_G4-XXX_DetSim-XXX.root
contains your generated events run through detector simulation.
5 - Look at the Generated Events in the Event Display
More information on how to use the event display are here.
Open a fresh terminal, log in to an sbndgpvm machine, and run
    source /sbnd/app/users/mdeltutt/static_evd/setup.sh
    evd.py -s $MY_WORKDIR/prodsingle_sbnd_SinglesGen-XXX_G4-XXX_DetSim-XXX.root
Click on “Raw Digit” in the top right, and you will see the waveforms from your generated events.
6 - Generate an Analysis TTree
Now that you have generated your own events, you can run one last job, which will extract all the relevant information for you and place then in an output ROOT TTree. You can run:
    cd $MY_WORKDIR
    lar -c run_hitdumper.fcl -s prodsingle_sbnd_SinglesGen-XXX_G4-XXX_DetSim-XXX.root
This will create a file called hitdumper_tree.root. You can explore
what is in the file:
    root -l hitdumper_tree.root
    root[0] hitdumper->cd()
    root[1] hitdumpertree->Print()
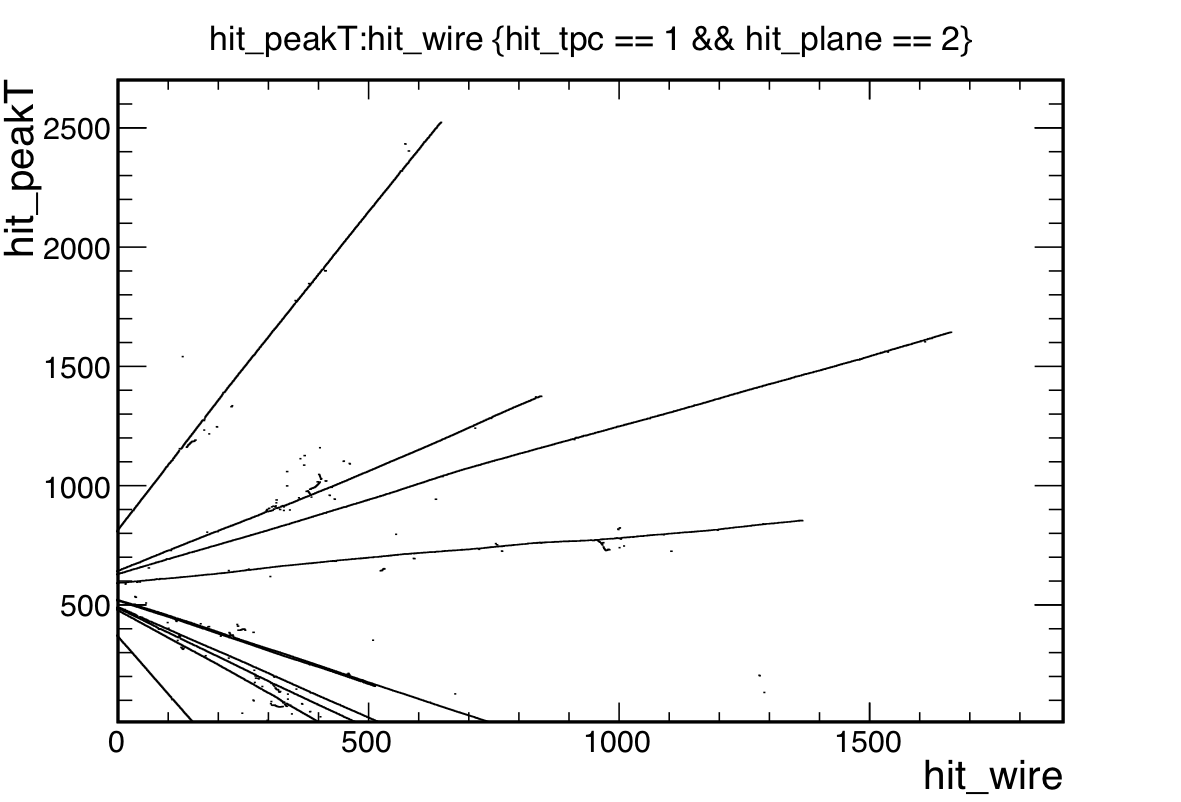
Let’s look at the hit time vs. hit wire for TPC 1 and only for the collection plane:
    root -l hitdumper_tree.root
    root[0] hitdumper->cd()
    root[1] hitdumpertree->Draw("hit_peakT:hit_wire", "hit_tpc == 1 && hit_plane == 2")
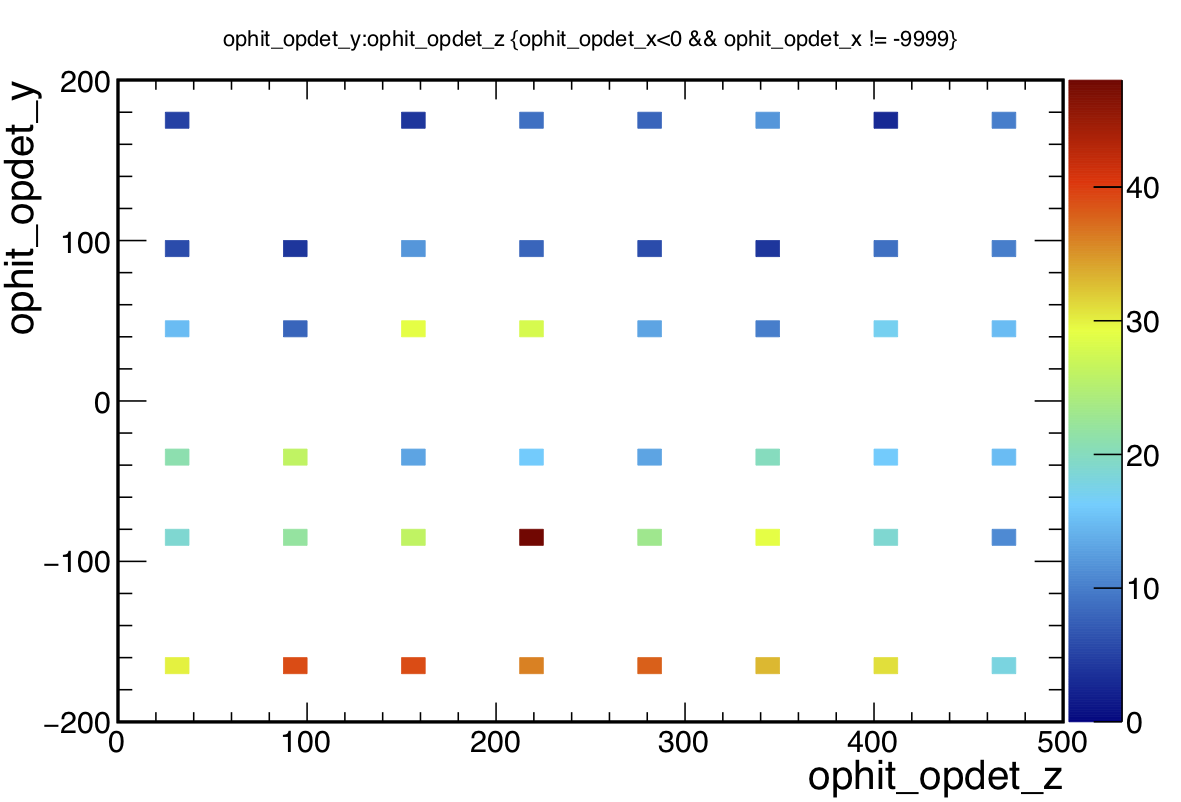
Or you can look at the optical hits. For example, let’s look at the Y and Z position of the stored optical hits in TPC 0. These correspond to the PMTs positions:
    root -l hitdumper_tree.root
    root[0] hitdumper->cd()
    root[1] hitdumpertree->Draw("ophit_opdet_y:ophit_opdet_z", "ophit_opdet_x<0 && ophit_opdet_x != -9999", "colz")
What are all the information stored in the TTree?
All the variables stored are described here.
7 - Available Samples
There are commissioning samples available that have already been processed and contain the HitDumper tree, check the commissioning samples page.